


All About Drybrush Technique For Watercolor With Cherry Painting Mini Tutorial
Drybrushing is easily my favorite watercolor technique. Learning how to incorporate it into my practice gave me much greater control, broadened my skillset, and ultimately brought greater enjoyment to the painting process and satisfaction in the final work.
This is generally considered at least an intermediate technique because it is best understood in context with a number of other techniques. However, I'm going to explain it from the ground up as concisely as I can, and then illlustrate how it all works with a mini watercolor tutorial where I will show you how to paint a cherry.
What Is The Drybrush Technique?
 In watercolor, drybrush relies on a damp, not dry, brush.
Drybrush is a technique in which a slightly damp brush is used with very diluted paint to layer over previous paint layers. The name is both illuminating and deceiving. Many people assume the technique requires a completely dry brush. Using a completely dry brush in watercolor does not work very well - even when lifting. This is something of a borrowed technique from other paint mediums, where a completely dry brush is what is required. In watercolor, the brush will seem very dry compared to looser, juicier work.
The term 'drybrush' can appear in a number of different forms: 'dry brush' or 'dry-brush' are also seen on the internet and in some books, however I defer to the authority of the American Society of Botanical Artists whose use of the term is what I follow: 'drybrush'.
Using this technique, you can build up as many layers as you wish. Ten to even forty layers are not uncommon in finished botanical work!
When Do You Use The Drybrush Technique?

A quick cloud study that relies heavily on drybrush technique to build up and deepen the sky, and to feather in the edges of the clouds.
The purpose of the drybrush technique is to build up and develop color by creating new layers on top of existing paint layers without disturbing the ones below.
This technique is commonly used in botanical and scientific illustration because of the vivid, luminous, and specific colors that are achievable with it.
Use this technique to create realistic and detailed colors and textures in your work. Depth, volume, luminosity, texture, and some degree of realism are generally the goals when turning to drybrushing. Because of this, it is a technique that is usually brought out for more polished and developed paintings. However, I enjoy leaning on this technique to add depth and brilliance to more casual paintings and even sketches.
For a botanical work, you may rely on drybrush to work the entirety of your painting, or you may just use it to develop the focal point of a quick painting on a postcard or sketch in your journal.
How Does Drybrush Work?
The drybrush technique functions by having your brush just wet enough to allow you to deposit new paint onto the surface of your painting, but not so wet that it reactivates the layers underneath it.
This technique relies on your control of the pigment-to-water ratio on your brush. When starting out, it is best to err on the side of going light on both pigment and water. The other major factor is brush control: pressure and stroke placement.
Pigment-To-Water Ratio:
As you press your brush against your paper it squeezes the water in your brush out onto the paper. Water will sink into the fibers of the paper, being pulled through the existing paint layers. That is what can cause previous layers of watercolor paint to get reactivated. When layers are reactivated they are ready to move and blend - this is what you are depending on when you lift (or remove color from a watercolor painting), however this is precisely what you don't want to happen when attempting to add a layer to previous ones.
A damp brush only has enough moisture to act as a conduit for the pigment you are laying down to reach the paper, (there simply isn't enough moisture there to begin to soak into the paper) and any moisture left behind will quickly evaporate.
You'll generally (not always) want to work with very diluted paint. This helps obscure the brush strokes used to lay down the color and allows a complex area to develop thoughtfully.
Brushwork:
You'll want to use your brush lightly, often just the tip! The harder you press on your brush the more surface area of the brush comes in contact with the surface of your paper, the more moisture is squeezed out, and the more likely you are to disturb previous layers (pressure alone can do it!).
In addition to being soft and light, you'll also want your brushstrokes to be somewhat rapid. Rather than the broad, juicy, sweeping strokes of a wash, you'll want these to more resemble hatching work (similar to cross hatching but without the cross!), lots of little lines next to one another, generally in the direction of the form you are painting or reflecting the texture you are trying to achieve.
You will quickly get a feel for when an area has reached its limit of being worked - something might show a sign of lifting or smearing rather than deepening. Once you have worked over an area, move on to a different one so the previous one can dry thoroughly before you begin adding another layer to it.
Drybrush Tips:
 Testing a loaded brush on scrap watercolor paper is very useful. You will immediately notice if your color is diluted enough or if it is too strong. Also you can watch to see if there are color pools at the beginning or end of your strokes (indicating you have too much water).
- Natural and/or older brushes can work best for this technique. This is because it is nice to have flexibility in switching from a fine point to a more frayed end (with lots of points). Synthetic sable brushes prefer to stay in a precise point. However, I personally have had good experiences using slightly worn synthetic sable brushes.
- Drybrush is a rather subjective technique, with different artists using differing approaches and definitions. Give it a try, experiment, and see what works for you!
- The real trick in drybrush is how dry? With practice you will quickly get a feel for this, which is better than any technical explanation I can offer.
- Let each layer dry completely before adding a new one on top of it! This is of paramount importance. You will simply smear and activate the previous layers if you are too impatient.
- If you are an impatient painter or are working in a humid environment, use a little hairdryer to speed along dry times. Just make sure to keep it far enough away from your painting to avoid burning the paper or pushing the paint around with the gust of air.
- Use scrap paper to test your colors first! This is especially useful when you are first learning this technique. This provides a preview of what you are adding to your painting - it will show you if your brush is too heavily loaded with paint or water.
- Instead of dipping your brush into pans, use a mixing palette to mix and/or dilute your colors, then dip your brush into that. This gives you more control and predictability.
- Use a blotter (paper towel or cloth) to remove excess water or pigment from your brush.
- Fray the end of your brush and keep it even drier to create more texture.
Drybrush vs. Scumbling
Scumbling is really a specific type of drybrushing, which artists define and describe in different ways. In general, it is a drybrush method where paint is applied to the paper using specifically a scrubbing action with a very dry brush for the purpose of creating texture. It generally relies on more textured papers so that color is scumbled onto the raised paper surface and the underlying color shows through on the untouched more recessed areas of the paper.
Drybrush vs. Glazing
Drybrush and glazing are both methods for layering. Glazing is much wetter, but still done lightly, quickly, and generally with diluted colors. It uses broader juicier strokes so that a more uniform yet very transparent layer is applied. It is useful to use in conjunction with drybrush as it has a way of pulling things together through its extra moisture.
Mini Tutorial
 A photograph I snapped of a Ranier cherry. You can use this as a reference to paint.
In the following mini tutorial I will show you how to apply the drybrush technique to a painting of a cherry. We just got a batch of beautiful local Ranier cherries, and their bright coloration and rounded shape make a perfect project to demonstrate this technique.
All told, this painting took just under two hours, including dry times. Drybrush is not fast. I can best liken it to needlework, and many watercolorists will compare the process of drybrush to weaving. Just remember to take your time, be patient, and recall that less is always more with this technique. You can always add more layers, so luxuriate in moving along gradually.
Suggested Supplies
 The supplies I used for this mini project, each listed below.
You can use whatever supplies you have on hand. Giving this a shot with what you have is better than not trying at all! Below is a list of what I used to complete this painting:
- Arches 140 lb. or heavier Hot Press paper
- Greenleaf & Blueberry Cherry Painting Palette
- Oval Mixing Palette
- Da Vinci Cosmotop Quill, Size 0
- Da Vinci Cosmotop Spin Round, Size 6
- Da Vinci Cosmotop Spin Round, Size 2
- Graphgear 1000 .9 Mechanical Pencil with HB Lead
- Prismacolor Kneaded Eraser
- Water Jar
- Paper Towel
- Scrap Watercolor Paper (ideally of the same type on which you will be painting)
Set Up Your Painting Area:
 Pools of pure color in enamel mixing palette indentations. Once these are dry, the "skins" are really useful for drybrushing because they do not add extra moisture to the brush the way pools of color do.
Make sure you have clean water and a fresh paper towel or handkerchief to blot your brush. Arrange your colors, mixing palette, water, blotter, and scrap paper together on the same side of the paper as your dominant hand (this prevents errant drips on the paper). Next, create diluted color pools of the main colors you will be using for your painting: Pyrrole Red, Quinoxalinedione Yellow, Quinacridone Magenta, Ultramarine Blue, Potter's Pink, French Red Ochre, Ultramarine Purple, and Cassel Earth. I use the circular indentations on our enamel oval mixing palette for this purpose.
Step 1: Drawing
 Graphite outline of the cherry, done using Graphgear 1000 .9 with HB lead.
Quickly sketch in general proportions, then create more precise lines. I enjoy using my Graphgear 1000 .9 with HB lead for initial sketching. It is soft and wide, but more precise than a traditional wood pencil. Also, the eraser at the end of it is very fine and perfect for refining details. If you would like to skip this step, you can download my drawing here. Either print it or transfer it onto watercolor paper. After your drawing is finished, you can use a kneaded eraser to lighten your drawing. Just use your eraser to dab at the drawing, or roll it into a worm and roll it over your drawing.

Using a kneaded eraser to lighten the graphite lines.
Step 2: Reserve White & Underpainting - Pyrrole Red, Quinoxalinedione Yellow, & Italian Green Earth
 Underpainting that lightly blocks color areas and reserves white areas.
Observe your subject and its colors. Try to visually break it down into different zones of color and value. Take special note of any white areas or other areas that receive reflected light or exhibit shine. I suggest that you avoid outlining these areas and instead use your color blocking to sketch them out.
Next, mix up the hue that is the lightest that you notice. For our cherry, I mixed up a very diluted mix of Quinacridone Magenta with a little Ultramarine Purple. Using my Size 0 Quill, I painted in this color anywhere there was reflected light or red, and left the white areas white. As long as your mixture is diluted enough, you can use your brush to sketch in your white areas now.
Next use diluted Quinoxalinedione Yellow to block in the yellow and orange areas of your cherry, still avoiding the reserved white areas entirely. Then I used Italian Green Earth to block in the entire stem. Let everything dry.
Step 3: Color Layer Plan

Take stock of your colors so that you can plan out roughly which to use when. I used our Cherry Painting Palette for this exercise.
Next, look at your cherry, take stock of the paints you have on hand, and plan out what colors you will use for which areas and a general order of application. I decided to start with layers of Pyrrole Red and Quinoxalinedione Yellow to develop the main color zones, and then add Quinacridone Magenta, French Red Ochre, Potter's Pink, and Ultramarine Purple to add depth in the darkest areas. I used Cassel Earth to add detail to the stem.
Step 4: First Layer - Pyrrole Red, Quinoxalinedione Yellow, & Cassel Earth
 First layer of color in place. It is easy to get frustrated at this stage - keep going!
Using a size 6 round brush, add in a light layer of Pyrrole Red to the red areas and Quinoxalinedione Yellow to the yellow and orange areas. Using your scrap paper, test what is on your brush before you start painting. This will let you know if your color is diluted enough or if you have too much water on your brush. At this stage, you can use a slightly wetter brush (almost a glaze) since you have a lot of ground to cover. Let dry. Using the very tip of your brush, add a layer of Cassel Earth to the stem to delineate the darker areas.
Step 5: Second Layer - Pyrrole Red
 Second layer!
Using drybrush technique, brush on another layer of Pyrrole Red anywhere you see red or orange. Go slowly, go lightly. Make small brushstrokes using just the tip of your brush. When you re-load your brush, dip just the tip quickly in your water cup, dab it off on your blotter, then just tickle the mixing palette where your color is, then test your brush on your scrap paper. If you get a nice light line without any water pooling at either end of the stroke (indicating too much water) and without a ragged or rough stroke (indicating not enough water), then start dabbing away at your painting again.
Step 6: Third Layer - Quinoxalinedione Yellow & Pyrrole Red
 Third layer!
Keep going, but now switching back to Quinoxalinedione Yellow in all of the yellow and orange areas. Notice how the color builds and develops slowly but surely. Then add more Pyrrole Red.
Step 7: Fourth Layer - Pyrrole & Cassel Earth
 Fourth layer...
Add another layer of Pyrrole Red to the redder areas, and add more Cassel Earth to the stem.
Step 8: Fifth Layer - Quinacridone Magenta
Add Quinacridone Magenta to the very darkest areas of red. It has a wider value range than Pyrrole and will offer some cooler undertones. This is a very subtle addition, but will help you map out your darker areas - think of it almost as your dark zone underpainting, but drybrush application.
Step 9: Sixth Layer - Potter's Pink & Ultramarine Purple
 Sixth layer
Add Potter's Pink and Ultramarine Purple to the very darkest areas. Be very sparing here! Use almost a stippling action with your brush here (tiny dots) to add in these darks and keep them well blended. You can add Ultramarine Blue if you need to go even darker.
Step 10: Details
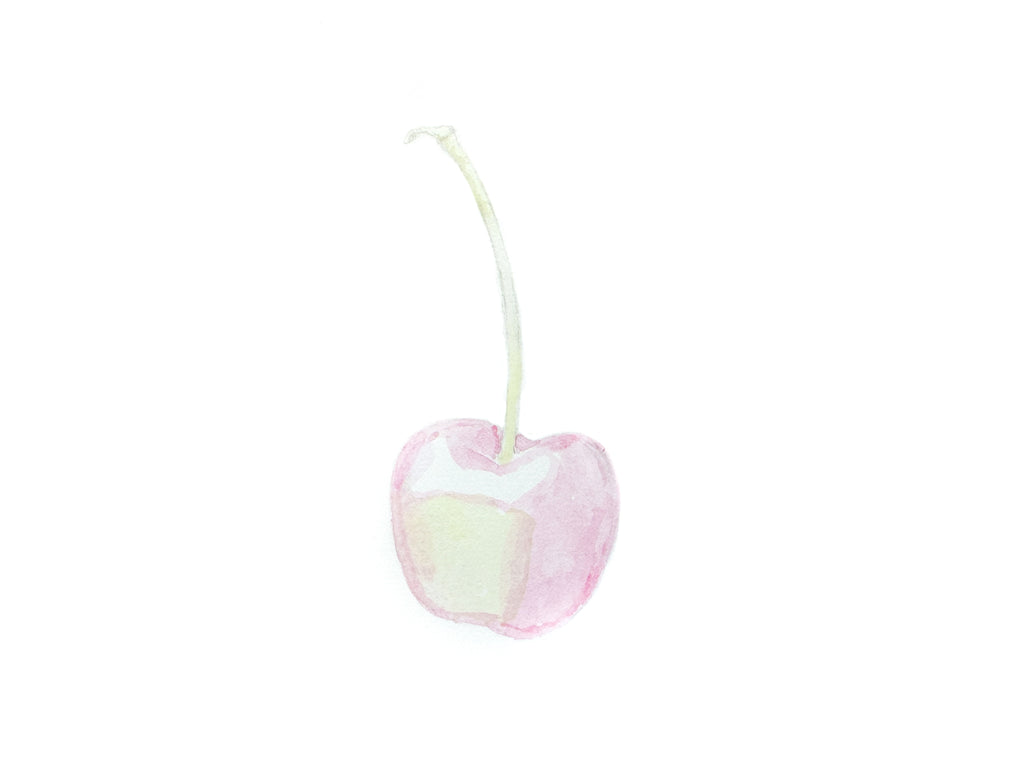
 Finished painting! Remember, the point of this tutorial is to demonstrate how the drybrush technique works to build up color in a controlled way. The object in doing this exercise is to practice drybrush - try to focus on the process more than the outcome!
You are now ready to add the finishing touches, and will want to switch to your size 2 round brush. Examine the white areas. Add in any subtle details and refine their shapes. Most shines do not have straight lines, nor are they entirely white. Add in the subtle red shadow created by the stem. Adjust any of the reflected light areas at the edges. Do any last refinements to the stem.
Then, avoid the inclination to keep fussing. Put your brush down and walk away. Get a drink of water, a snack, take a break. Then come back and look at your painting with fresh eyes. If you feel dissatisfied, try to be objective and instead of fussing with this painting, resolve to keep practicing and make more. Remember this is just practice, not a performance. Think about what you learned from this painting session. It is important to keep your focus on your practice and the process.
Conclusion
In writing this post, my hope is to offer a useful new tool to anyone unfamiliar with drybrush, and offer some thoughtful detail to those who already enjoy employing it in their practice.
The single biggest complaint I hear repeated about watercolor is lack of control - mastering this technique will give that to you. Add in an understanding of color theory and you are rolling!
I hope you found this useful. Please add in any questions you still have to the comments!
As always, thank you for being here and wishing you happy painting!
